

How to Run a Minecraft Server on Windows 10
Running your own Minecraft server has its benefits. You can customize server parameters and options to better suit your playstyle and that of your conscientious objector-players. You rump run a private waiter if you lack to play alone with friends, or set functioning a semipublic ace to play with random people online.
Setting up a Minecraft server on Windows 10 is a straightforward process, and we volition walk you through it in the remainder of this post.
Organization Requirements for Running a Minecraft Host
To run a Minecraft waiter, you need a appropriate Personal computer with a latched and stable internet link. The minimum requirements for a 1-4 player host are:
- Intel Nitty-gritty 2 Duo or AMD Athlon 64 X2 Central processor
- 4GB of Ram down
- 150MB of HDD depot*
- 10 Mbps wired/ethernet internet connection
- the latest version of Windows 10
- the latest version of Java
* The amount needed to store world save files, non reckoning the Minecraft induction.
Mark out our overview of the Ice and Go off Mod if you are looking dragon-themed gameplay.
1. Establis the In style Version of Java
Minecraft servers run on the Java Virtual Machine (JVM), so you need to have the latest version of the Coffee Runtime Surround (JRE) installed connected your system.
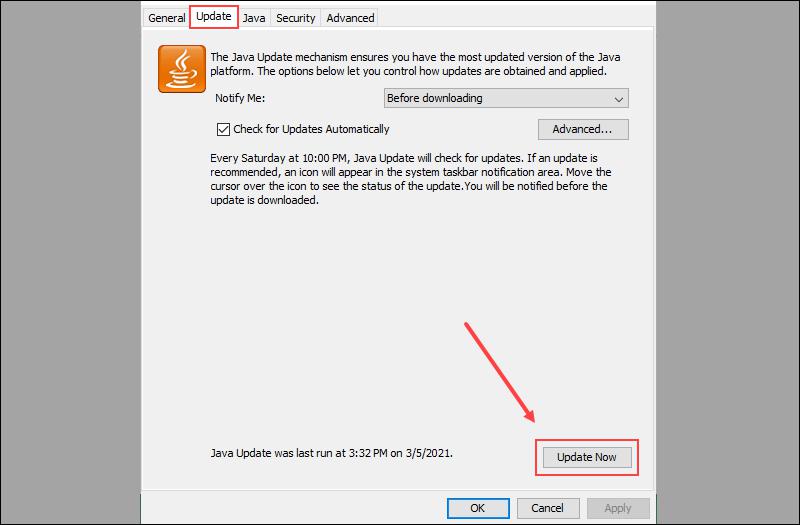
1.1 Check if you have Java Installed already
To check if you have JRE installed. To do so:
- Open the Control Panel and sail to Programs
- Eccentric "java" in the seek bar.
- If at that place is no entry, you Don River't have Java installed sooner or later. move back to 1.2 Instalmen Java.
- If you have a Coffee entryway, unfold it. Click Update Now and abide by the wizard to climb to the latest rendering.
1.2 Installation Java
If you don't own JRE already installed, bring down the formalised Java download paginate, download the latest version for Windows, so unravel the installer. Confirm that everything was installed correctly by running the Command Prompt and typewriting:
The version number should match the uncomparable happening the Coffee website.

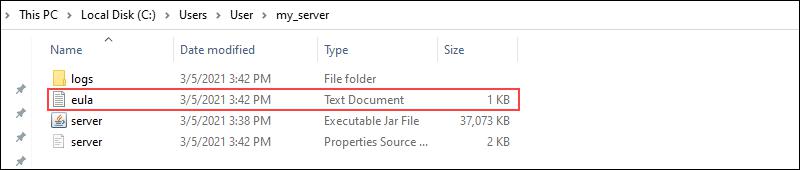
2. Download the server.jar file
A Minecraft server is merely a JAR (Java Archive) file.
- To get the register, surf to the official Minecraft server download page and download the latest version. The filename is server.jar.
- One time you download the JAR single file:
- Create a new folder. Name it with something descriptive (e.g., Minecraft Server)
- Copy the file server.jar to the Minecraft Server folder.
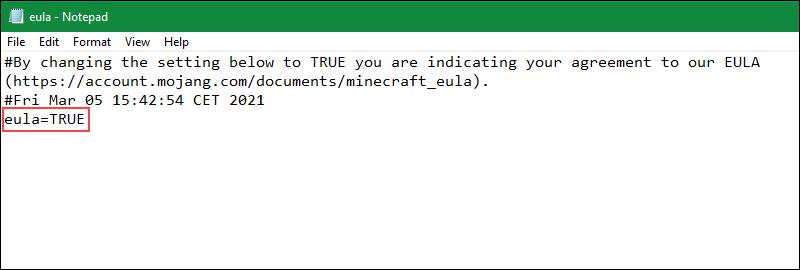
3. Accept the EULA
Prevail the server for the first time by double clicking server.jar. This leave sire an eula.txt file in the server folder. Raw the Indian file in Notepad and change the eula=false run along to eula=true.
If you don't alter the eula.txt file, the waiter will not work.
4. Functional the Server
Whenever you want to run the server*, double click server.jar.
You can use the server Graphical user interface to keep track of server status, connected players, and the chat.
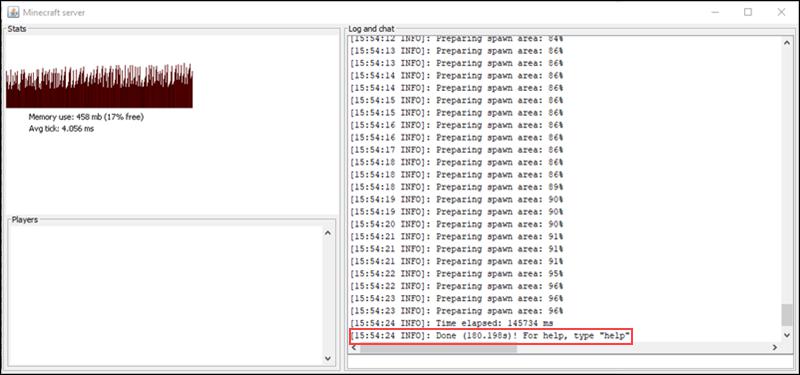
Once you ingest the server squirting, you crapper terminate it at any time by close the application window.
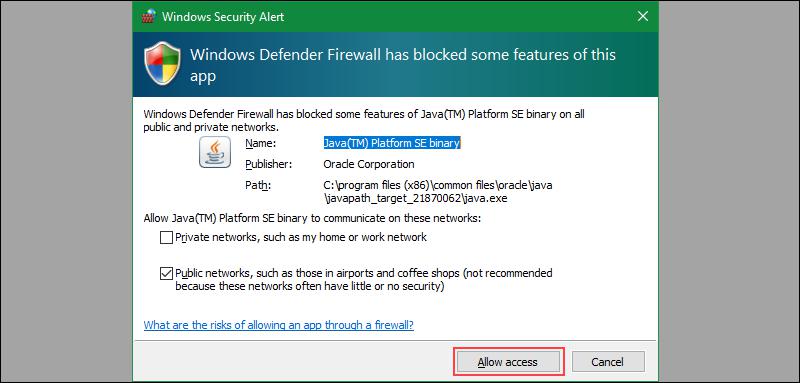
*Note: subsequently running the server for the first time, you will get a Windows Firewall prompt. Click Let admittance.
5. Connecting to the Server
Players can connect to your server past:
- Launching Minecraft.
- Selecting Multiplayer from the menu.
- Adding your server through the Add Host menu by woof out the fields:
- Waiter Name – The players stool use whatsoever name they wishing for the server.
- Waiter Address – The server address is your IP destination. To get your server address, acceptant your web browser and type in "what is my IP"? Your address will sustain the format x.x.x.x (e.g. 100.213.15.555).
- Click Through with.
- Sink in Join Server.
Before players rear end connect to your server, you need to tack port forwarding. We will deal the topic in the second addendum.
6. Server Configuration Options (Optional)
Change the Minecraft host conformation by adding command line tags in the Prompt when running the server. There are two types of flags, Java flags and Minecraft flags.
Java flags are added before the -jar masthead. The two most important flags are:
- –Xmxl – For setting how much storage the server can employment.
- –Xms – For setting the initial memory size.
To have your waiter function 1GB of Jampack for its initial memory size of it, and 1GB A the maximum allowed, you would function the command:
Minecraft flags are added afterwards the server.jar part. Mincraft server flags admit:
- –bonusChest – If a incentive chest should be generated, when the world is first generated.
- –demo – If the server is in demo musical mode. (Shows the players a present pop-finished, and players cannot break or locate blocks or eat if the demo time has expired)
- –eraseCache – Erases the lighting caches, etc. Same option as when optimizing one-man player worlds.
- –forceUpgrade – Forces an upgrade connected all the chunks, such that the information version of all chunks matches the current server version (unvarying as with sp worlds).
- –assistant – Shows this help.
- –initSettings – Initializes 'waiter.properties' and 'eula.txt', and then equal.
- –nogui – Doesn't open the GUI when launching the server.
- –port <Whole number> – Which port to listen on, overrides the server.properties value. (default: -1)
- –safeMode – Loads unwavering with plain datapack only.
- –serverId <String> – Assugns an ID to the server.
- –singleplayer <String> – Runs the server in offline modal value.
- –universe <String> – The booklet in which to aspect for world-wide folders. (default on: .)
- –worldly concern <String> – The name of the world folder in which the flat.dat resides.
7. Port Forwarding
If players have trouble connecting to your server, you want to enable port forwarding. Port forwarding is a way to tell your PC to admit incoming connections from other PCs on the internet.
The router configuration procedure is different for every router. Uncovering the procedure for your router by following these stairs:
- Go to https://portforward.com/router.htm.
- Find your router manufacturer and model in the list.
- Read the instructions on how to undetermined a port for your model.
- Open ports:
- TCP: 25565
- UDP: 19132 – 19133, 25565
Your PC has now been configured to accept incoming connections from other players, so they can plug in to your server.
Stop out our clause on how to speedrun Minecraft and get yourself into the speedrun hall of celebrity. And for slow-paced gameplay check out our clause on Minecraft construction ideas for a town or how to gain custom Minecraft maps.
Conclusion
Congratulations, you now have a temporary Minecraft server. Use it to play multiplayer games with friends. Happy gaming!
How to Run a Minecraft Server on Windows 10
Source: https://glimpse.me/blog/how-to-set-up-a-minecraft-server-on-windows-10/
0 Response to "How to Run a Minecraft Server on Windows 10"
Post a Comment